In my previous flashes assignments I countered a problem is that when replaying the sound again and again. This problem happens when the previous sound is still playing. So, I suggest a solution:
In the replay button we add this code:
on(release)
{
stopAllSounds();
gotoAndPlay(1);
}
In the first frame of timeline add this code :
firstSound=new Sound();
firstSound.attachSound("main");
firstSound.start(0,999);
"main" is the name of linkage of sound imported in the library.
In the "on" button of sound we add this code:
on (release) {
_root.firstSound.setVolume (0);
this.gotoAndStop("off");
}
In the "off" button of sound we add this code:
on (release) {
_root.firstSound.setVolume(100);
this.gotoAndStop("on");
}
This is the most simple way to solve the problem when the sound play again and again at the same time.
Sunday, January 4, 2009
Snow or rain in flash(Wk11_1)
During complete my flash assignment on typeface I found that the flash will become more interesting if it contains rain or snow or anything falling down randomly.In order to make this effect, we create a an object with shapes of small circle(for snow) or sharp oval(for rain) in a new layer at the first frame and convert it into a movie clip. In this tutorial I will introduce the way to make a falling snow. After converting to a movie clip, we name it as "snow" in instance of this movie clip. Next, we add this action script code for the movie clip :
onClipEvent (load) {
movieWidth = 350;
movieHeight = 263;
i = 1+Math.random()*2;
k = -Math.PI+Math.random()*Math.PI;
this._xscale = this._yscale=50+Math.random()*100;
this._alpha = 75+Math.random()*100;
this._x = -10+Math.random()*movieWidth;
this._y = -10+Math.random()*movieHeight;
}
onClipEvent (enterFrame) {
rad += (k/180)*Math.PI;
this._x -= Math.cos(rad);
this._y += i;
if (this._y>=movieHeight) {
this._y = -5;
}
if ((this._x>=movieWidth) || (this._x<=0)) {
this._x = -10+Math.random()*movieWidth;
this._y = -5;
}
}
We must also look at the movieWidth and movieHeight, we must adjust these based on our size of the flash.
after all, we add this code for the first frame in the timeline:
for (k=0; k<50; k++) {
duplicateMovieClip(this.snow, "snow"+k, k);
}
Now, let's check what will happen :) .
Source(Vietnamese): http://www.ngovancong.com/?nvc=act:news|newsid:980
Sunday, December 21, 2008
a view of computer system under drawing of brush(Wk9_2)
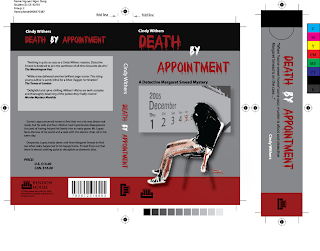
A view of my book cover and bookmark design(Wk9_1)
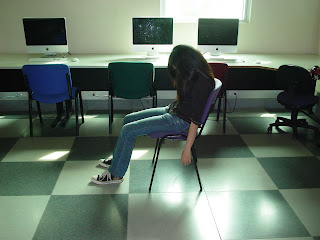
In this week I designed a book cover and bookmark for my assignment. This is an interesting assignment because it helps us know how to design a book cover and a bookmark practically. Basically, my design based on white, gray, and specially bold red for blood due to this is a book of a mysterious story. The center point of my design is a died girl on the chair. This image I took it from my friend and used basic skill on photoshop to get her picture in threshold. The most interesting thing is that the knife on her hand and blood on it was made by me with only gaussian blur effect of photoshop. Finally, I looked at margin of my design mostly to follow the rules of gestalt and all of text in my design were arranged into same lanes.

Sunday, December 14, 2008
From original image to threshold(WK8_1)
Sometimes people want to use an image with only black and dark black for some purposes of illustrating. this is quite easy with the help from Photoshop. It's quite easy: firstly, open the image that you want to get a piece of it, double click on background layer to let it becomes layer 0 . Use pen tool (Ctrl+P) to trace the area that you want to select in a new layer. After tracing it successfully, right click and choose make selection and it becomes a selected area. Next, go to Image\adjustment\threshold and save the image as type that you expected.


Sunday, December 7, 2008
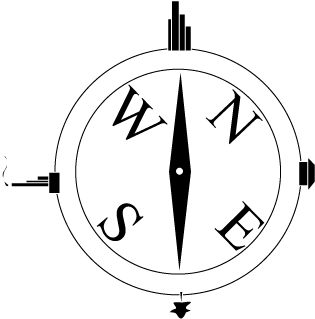
A simple flat world(Wk7_2)
Let's imagine a simple view of our earth: It was created from two polars: Northern, Southern and two directions: West and East. If we illustrate our Earth in a scientific way it may become complicated. However, in the view of art, a world can be illustrate by a flat compass with towers, house on it. 

Photomontage (Wk7_1)
An image which is created by photomontage is a photo in which people can find many different meanings from the original photos. In this week I had an assignment for creating a photomontage with at least eight different photos. I decided to create a photomontage about about the history of USA under president George Bush's period. This photo was created with main potrait of Mr.George Bush at the center of the photo. Main events in Mr.Bush's period was recreated: terrorist attack on 9.11.2001, Iraq and Afghanistan wars, economic crisis and the first time in USA history a Negro American Mr.Obama won in the president election.

Subscribe to:
Comments (Atom)

